The process of changing the eye colour in Photoshop is actually a pretty simple one, requiring only a good mouse (it's hard to do this with a touchpad) for the selection of the iris.
Step one: open a person's photo in Photoshop (a picture taken with a high megapixel number is preferable). I'll open the one below
Now, zoom in (Ctrl and +, and press Alt while click&dragging to center the eyes) on the eyes and press Q to enter in Quick Mask Mode. Select the Brush Tool (hardness 100 and pick a lower size, like 13-15).
Start painting over the eyes. Notice that you will paint with red colour. Don't worry, we're just making a selection (the eyes won't turn red). If you want to erase a part of the selection, press X and paint over that part. Press X again to return to normal mode. Keys [ and ] are used to decrease/increase brush size.
When finished, press Q again to exit Quick Mask Mode, then hit Ctrl+Shift+I to revert the selection (to select only the eyes). Copy the selection (Ctrl+C), then create another layer and Paste (Ctrl+V). You should get something like this (background is not visible):
Select the layer containing the eyes (make sure the background is visible) and go to Image - Adjustments - Hue&Saturation. Play with the sliders until you get the desired colour. Once you do that, play with the Opacity slider of this layer (i've reduced it to about 75%)
If you finished, hit Ctrl+Shift+E to Merge Layers, than save your work.
Tuesday, March 31, 2009
Sunday, March 29, 2009
With the help of Photoshop (I used CS2 for this article), you can create a website layout in a very few steps. But notice that the site will not work until you add functionality to it (you can do this by using another program such as Dreamweaver).
Let's say that you downloaded the following free template (or you just made one yourself):
It's just an image, but to make it useful (and to reduce the loading time) we must slice it. Some slices can be converted to buttons or can be used as another template (the sub-pages)
In the toolbox, find and select the Slice Tool (you can find it under the Crop Tool). The Slice Select Tool under the Slice Tool is used for selecting, renaming and resizing slices.
Now, all you have to do is create the slices (the begin point should be the upper-left corner of the layout). Put every layout button in a separate slice, and rename it (right click - edit slice options), and remember to slice the whole image, without having any gaps (unsliced space)
Once you finished slicing, go to File - Save for Web, select all the slices, choose the image quality from the right (the better the image quality, the slower it will load - usually 80 is a decent choice), and hit the Save button. From Save as Type select html+images
Photoshop will create a file named index.html and a directory (Images) containing all the slices. This is just the first part of creating a website. Now you need to import index.html (and the Images folder) to another program in order to make it functional. If your site will have sub-pages looking almost like the homepage, open again the layout in Photoshop, slice it, and select&save only the slices you need, using another name (page1.html for example).
Usually, the buttons have 2 states (one natural state and another one when the mouse is over) thus resulting 2 separate images. You can do this by modifying the button colour (for example), renaming the slice and saving it with another name.
Friday, March 27, 2009
This is the first article from the series of articles regarding photoshop text effects. A lot of Web 2.0 layouts contain mirrored text, just like this one:
Let's begin by creating a new file (600*300 pixels). Fill it with a black colour (Edit - Fill - Black). Type some text on the canvas (The font i used is Myriad Pro, size 60pt). Don't worry if it's not aligned with the black background. You can allign it by selecting both layers (Ctrl is required) and then: Layer - Align - Vertical Centers and Horizontal Centers.
Duplicate the text layer (drag it to the Create New Layer button) and follow this steps:
- Edit - Transform - Flip Horizontal
- Edit - Transform - Rotate 180 degrees
Move the mirrored text downward, until it looks like this:
Finally, we need to add a Layer Mask (click on the Add Layer Mask button, located next to the fx button in the Layers Window). Select the Gradient Tool and the white-to-black fill type, and drag a straight vertical line just like here(using the shift button):
If you don't like the result, hit Ctrl+Z and draw the line again. Finally, reduce the opacity of this layer to about 25-30%, and the resulting image should be just like the first one in the article.
Thursday, March 26, 2009
In this post i will talk about photoshop layers. Adobe introduced this for the first time in Photoshop version 3. Simply put, a layer is an image on top of another (the background image is the first layer). If the blending mode is set to Normal, the top layer will become visible (the items in it) and the layers below him will not show up (unless the items in the first one are smaller than those you can find in the other layers)
For example, let's open a new document in Photoshop CS4 (width and height don't really matter). Using the Ellipse Tool, draw a circle like the one below, filled with black (hold Shift to draw a perfect circle). Notice that another layer was created in the layers windows (press F7 if it doesn't show up) Now, draw a blue rectangle using Rectangle Tool. Another layer was created. Right now, we can not see the black circle, but if we change the blending mode to Multiply it will show up (a mixture of the layers appears. You can use different blending modes to obtain different effects)

If you set the blending mode to normal, and switch the layers between them, the black circle will show up on top of the blue rectangle.
Layers are very useful when you prefer working on a copy of an image, for example. You can just duplicate the current layer (Layer - Duplicate layer, or drag it to the Create New Layer button) and start working on it. If you don't like the results, you cand always delete the layer (drag it to the Delete Layer button) and start all over again, making another duplicate.
Sunday, March 22, 2009
Let's say that you were in a hurry, and took a picture that is actually a little bit twisted. Just like this one
To correct it, you need to find the Ruler Tool (under the Eyedropper Tool), then you need to draw a "line" joining 2 points that are supposed to be inline if the image was straight. Follow the example below and start making the first click somewhere in the red selection, and the second and final one in the next red selection.
Now, go to Image - Image Rotation - Arbitrary (notice that a value is already inserted there) and hit OK. Photoshop will straighten up the image, but notice now that we must get rid of that white border. The solution is to crop the image, using the Crop Tool.
Make a selection, and then rightclick on it and select Crop.
The final image should look like this
In this tutorial i will explain how you can censor someone using a filter in Photoshop. Let's open up this image and say that we want to censor the girl with the tongue out
First of all, you need to make a selection of the whole face using the Elliptical Marquee Tool (first you must click&hold on Rectangular Marquee Tool in order to see it). The shortcut for this is M.
Then, go to Filter - Pixelate - Mosaic, and play with the slider until you like the result. If the Cell size is very small, you can still see the face, so it's better to raise it up to about 18, in this case. Here is the result:
Quick note: hit Ctrl+D to make the ellipse dissapear
Friday, March 20, 2009
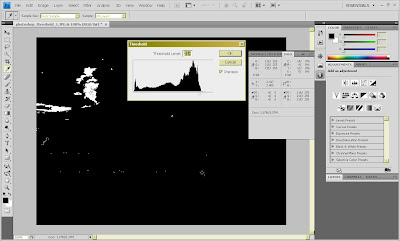
What is this threshold and what's its use? Well, thresholding is a method of image segmentation. If we apply it to any given picture, it will show us the same picture but only in 2 colours: black and white, whitout any grays.
And how does this help us? Well, you can:
1. set the white point or black point of a photo (very useful)
2. create duotones pictures (just for fun)
So, open this picture in Ps:
Then, go to Image - Adjustments - Threshold (or, in the Adjustments panel in the right of the screen, click on Threshold). Now, scroll down the slider to the value 6, and notice that the blackest point is on a person's Tshirt. You can mark that point by holding down the shift key and that clicking on it. The Info tab will apear, saying that that point is black: Red=0, Green=0, White=0.
Move the slider all the way up to 214, until a few spots of white remain on the picture. Again, shift-click on a white point, and notice that this one's values are: Red=255, Green=255, White=255
And now, for the duotones: move the slider in the Threshlod window to 63. Then, go to Image - Adjustments - Hue&Saturation (or click on Hue&Saturation located in the Adjustments panel), click on Colorize, and enter this values: 200,75,-57.
Thursday, March 19, 2009
Have you ever took a picture and noticed that the subject is a little bit hard to find, or you just wanted to cut off some items? Here's how you can do it.
Let's say that we have this photo, with a butterfly in it, and we want to trim down the picture to make the butterfly somehow be more emphased.
Let's open the picture above in Photoshop CS4. After doing that, select the Crop Tool from the toolbox (or just press C on your keyboard). Make a selection like this one:
Notice under the menu bar some settings for the Crop Tool. Adjusting the opacity value makes the rest of the uncropped picture less visible or more visible. I prefer to use a value of 90. The perspective button is used to make an irregular Crop selection. Will talk about that later.
When the selection is made, just right click on it and select Crop. That's it. Always save your work (different file)
Did you ever take a picture on a winter day and realized after that the snow is kind of blueish? Or someone's face turned out to be a little red than it's supposed to be?
This happens because common digital cameras (whitout the manual white balance option) have some difficulties in setting the correct temperature of the white point.
Let's take for example this picture:
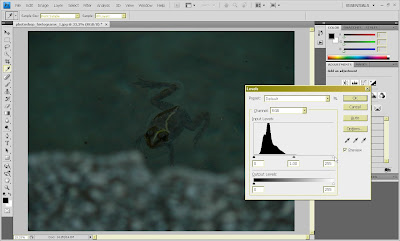
It is obvious that the colour cast is unrealistic. The colour blue is predominant, and that's bad. Let's fix this in Photoshop CS4, in a couple of seconds. The are many ways to do it, and i will show you how to do this using Histograms. Open the image above in CS4, then open the Histogram Windows by pressing Ctrl+L. Make sure that the Preview box is ticked, then click on the middle eyedropper (the gray one). The next step is to find a gray point in the picture (a point that is supposed to be gray). Just click on any of the rocks, for example.
Now, the image looks just like the one below. More life-like, isnt't it? You can apply this method to any picture that has bad colour cast. For example, if the snow isn't white, just click on the middle eyedropper and then on the snow.
Tuesday, March 17, 2009
A histogram is a graphical display of the colour tones in the picture across the brightness scale. Almost every digital camera (especially DSLRs) have this very useful function. And why is it useful?
Let's take for example the picture below
If we open it with Photoshop and hit Ctrl+L (or Image - Adjustments - Levels) a new window with graph will show up looking like this:
We can interpret this histogram like this: the image (just taken out of the camera, without other post-processing) is a little bit dark overall (or underexposed), without having bright colours or highlights. Notice that the graph (looking like a black mountain) is located in the left of the window, meaning that it's the brightness values are low.
To "fix" this photo, we can simply click the Auto button, or we can manually adjust the white arrow below the graph, dragging it to the left until the image looks better.
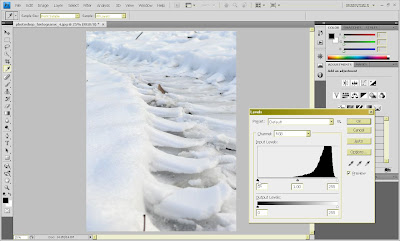
Let's open the next image. The first thing we should notice is that the colour white is predominant, and there are very few dark tonalities (also, there is no black).
This image is slightly overexposed. The histogram is positioned to the right:
To correct this, just push the Auto button, or drag the black slider a little to the right.
A picture correctly exposed will have a histogram looking like this:
Notice that the histogram is well balanced across the darkest and lightest margins.
First, i must mention that i'll be working on an 1280*800 monitor, so if you have a 4:3 screen mode things will look different. Until recent i've worked with Photoshop CS2, and now that i've updated to the newer CS4 i must say that the UI changed a bit.
The default Workspace is set to "Essentials" and from the drop-down menu you can choose different layout modes like painting, video, web, etc. I will be using mostly this workspace.
Another nice feature is "collapse to icons - expand panels". This is how this works: click on the 2 arrows located in the top-right of the Color Panel. Now, instead of the panels, icons will apear. To revert to the initial stage, click again on the 2 arrows
 On the left side we see that the toolbox is consisted of one thin column with icons (but this can be reverted to the 2 columns layout by clicking on the 2 arrows from the top-left)
Depending on your preferences, all the panels can be moved around the workspace, and additional windows (such as Styles, Actions, Brushes etc) can be turned on or off (by accessing the Windows menu)
Sunday, March 15, 2009
Welcome!
I'll be working with Adobe Photoshop CS4. The tutorials on this site are not copied/translated from an another foreign source. For any questions/remarks, you can always contact me via comments or my mail.
You cand download photoshop cs4 from Adobe's site
Now, let's learn some Photoshop!
